Video files in Google Drive often require trimming, captioning, or audio adjustments before sharing. Selecting the right approach from available editing options can prevent unnecessary delays and frustration. Basic built-in tools suffice for quick fixes, while more advanced features may be necessary for a polished finish. How do I edit video in Google Drive to maintain efficiency and quality?
Integrating third-party apps can transform raw footage into engaging content ready for social media. A clear editing process minimizes manual syncing and enables a smoother transition from storage to publication. Crayo streamlines this process by providing tools that automate captions, effects, and formatting, and its clip creator tool helps produce polished clips while reducing technical hassles.
Summary
- Google Vids provides basic trimming and text overlay capabilities directly in your browser, but it lacks multi-track timelines, independent audio controls, and color grading tools. TechRepublic's 2024 analysis found that teams often export from Google Vids and then import into more capable editors to add finishing touches, creating a two-tool workflow that defeats the purpose of using an integrated platform. The limitation becomes apparent when you need precise sound design or visual effects such as green-screen removal and footage stabilization.
- Formatting content for multiple platforms creates the biggest time drain in basic editing workflows. When you're posting the same clip across TikTok (vertical), Instagram (square), and YouTube (horizontal), you manually crop, reposition text overlays, and re-export for each destination in Google Vids. If you're creating five variations of the same promotional clip, you have to repeat the same formatting steps five times, with no template system to remember preferred caption styles or to batch-process multiple files.
- AI-powered tools deliver inconsistent results because they rely on prompt phrasing skills most creators haven't developed. Google Vids' Gemini AI engine treats every project as isolated, rather than learning your preferences over time, which means you constantly have to re-explain creative intent instead of refining templates. The trial-and-error cycle of tweaking prompts until output is acceptable becomes a bottleneck as content schedules accelerate, with creators spending more time coaching AI than creating.
- Professional polish remains out of reach for externally facing content, where visual quality signals credibility. Colors look flat without grading capability, transitions feel abrupt without precise control, and audio remains at a single volume level throughout clips. When content competes with creators using tools built for social media performance, the visual gap becomes a credibility gap, with viewers scrolling past videos that appear unfinished, regardless of their informational value.
- Subscription costs for professional editors like Adobe Premiere Pro accumulate faster than one-time purchase alternatives, but the investment makes sense for team collaboration and client compatibility. DaVinci Resolve offers high-end capabilities with a generous free version, though it requires significant system resources and takes considerable time to learn compared to beginner-focused alternatives.
- Crayo's clip creator tool addresses bottlenecks in formatting and platform-specific adjustments by generating optimized versions with subtitles, effects, and dimensions tailored for TikTok, Instagram, and YouTube in seconds, rather than requiring manual exports and caption repositioning for each aspect ratio.
Can You Edit Video in Google Drive?
Yes, you can edit videos directly in Google Drive using Google Vids, a browser-based tool built into Workspace. It handles basic tasks like trimming clips, rearranging scenes, and adding text overlays to MP4, QuickTime, OGG, and WebM files without requiring downloads or third-party software.Editing happens entirely in your browser, allowing you to work with teammates in real time and access your projects from any device with an internet connection.
Google Vids is great for simple projects where you need to cut out unneeded footage, combine a few clips into a sequence, or add basic captions. It helps create internal training videos, quick explainers for your team, or basic social media content that doesn’t need much polish.Since it is available in most Google Workspace plans, teams already using Drive for file storage can start editing without needing new subscriptions or additional training. If you're looking for advanced features, our clip creator tool offers greater flexibility and creative options.
The tool focuses on speed and simplicity rather than giving extensive creative control. You can trim the start and end points of clips, rearrange scenes, and add text or music over your footage.According to TechRepublic's 2024 analysis, these features address the most common light editing tasks teams perform when repurposing recorded meetings or creating short presentations. The interface will feel familiar if you’ve used Google Slides or Docs because it uses similar drag-and-drop features and sharing permissions.
What are the key collaboration features?
Collaboration is the tool's strongest feature. Multiple people can view the same project simultaneously, leave timestamped comments on specific frames, and suggest edits without affecting each other's work.When working on a video with stakeholders in different time zones, this real-time feedback loop prevents the versioning chaos that occurs when files are exchanged via email attachments and desktop editing software.
What are the limitations of Google Vids?
The limitations become apparent when content requires more than basic assembly and cutting. Google Vids doesn't support multi-track timelines, so users can't stack multiple video clips or adjust audio levels independently. This limitation also makes it difficult to use scene transitions in detail.Without color grading tools, footage shot under different lighting conditions can often look uneven when combined. Plus, this platform lacks effects libraries, motion graphics, and advanced text animations.
Audio control is a significant challenge for creators who require precise sound design. While you can add background music, you can't adjust the volume curves, and you can't remove background noise or precisely sync audio edits to visual cuts.
For example, if a clip contains wind noise or echoes from a conference room, there is no way to remove them. The same issues arise with visual effects, such as removing green screens, stabilizing shaky footage, or speeding up clips to highlight key moments.
How does scaling content production affect editing?
Real friction arises when scaling content production. Each video needs to be assembled manually, with text placed in the right spots and export settings adjusted.If you’re making five versions of the same promotional clip for different platforms, you’ll find yourself repeating the same formatting steps five times. There is no template system that remembers your favorite caption style, no batch processing for multiple files, and no automation to change aspect ratios or lengths based on where the video will be shared.
Most creators face this problem when they move from occasional video projects to a regular content schedule. The usual approach is to edit everything manually in Google Vids, since it integrates well with file storage. As output increases and platform needs change: vertical for TikTok, square for Instagram, and horizontal for YouTube, the time spent changing clips can go from minutes to hours.As a result, quality suffers because the focus shifts to rushing through technical steps rather than improving storytelling. Posting schedules can also fall behind because the process can't keep up with growing goals.
What alternative tools can ease editing workflows?
Tools like Crayo's clip creator handle formatting and technical barriers that slow manual workflows. Instead of cutting each clip individually and typing captions for every frame, the platform creates polished short-form videos with automatic subtitles, effects, and aspect-ratio adjustments optimized for social algorithms.You just connect your raw footage, and the AI handles the tedious steps that can take hours in basic editors. This lets you focus on finding the right clips and trends instead of struggling with export settings.
When is Google Vids the right choice?
Google Vids is well-suited for situations where speed is more important than production value. For example, company updates, meeting summaries, and onboarding videos are times when the message matters more than its appearance. If your audience primarily cares about the information and is unlikely to pay much attention to visual quality, this tool provides what you need without complicating matters.
Short explainer videos for internal knowledge bases also fit these needs well. When you document a process for teammates or make a quick tutorial for your company's shared drive, being able to edit and share from the same platform makes things easier. The video stays in the system where your team already works together, and permissions automatically match your current access controls.
What to consider for external content creation?
Once you start creating content for outside audiences, whether you are competing for attention on social media or building a brand through videos, the gap between simple and purpose-built editing tools becomes impossible to ignore. The question changes from whether Google Drive can edit videos to whether its editing capabilities meet the speed and quality standards needed for your content strategy.
What do people often miss when editing in Google Drive?
Many users miss out on important features when they start editing in Google Drive. Understanding these features can improve productivity and streamline the editing process. For those looking to enhance their editing capabilities, our clip creator tool provides a seamless way to capture and share highlights effectively.
How to Edit Video in Google Drive in 4 Quick Steps
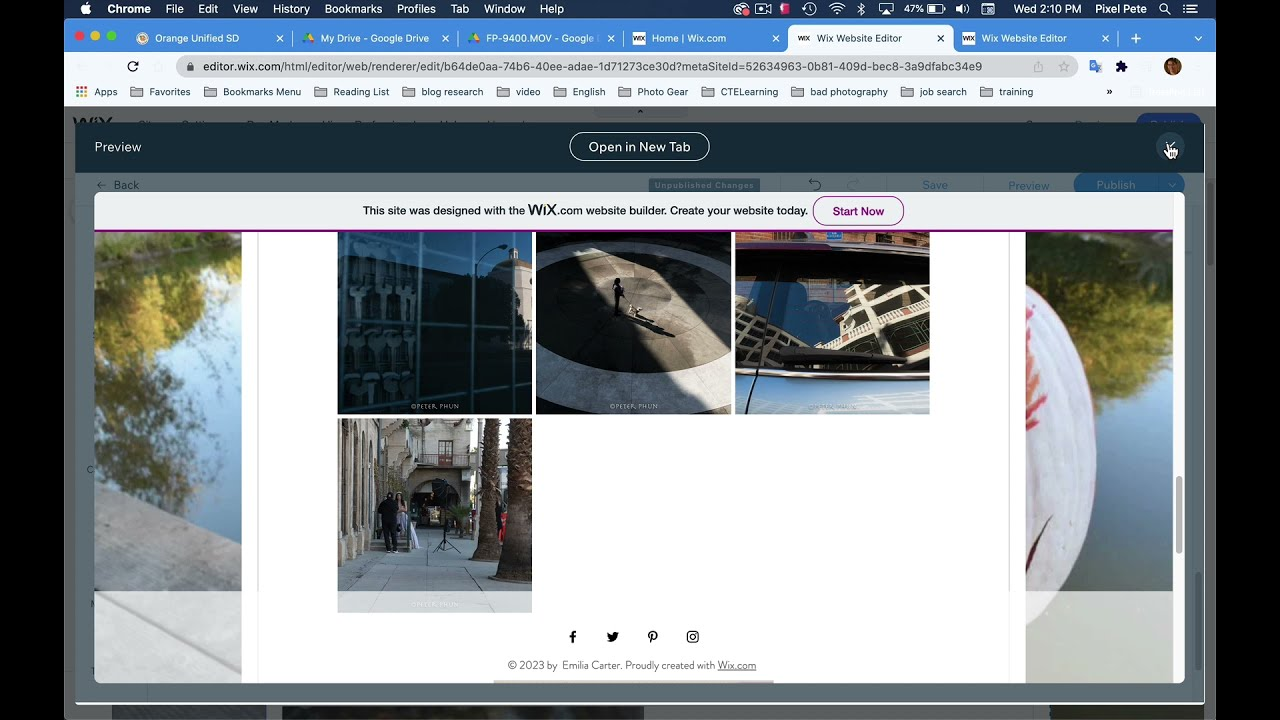
Open your browser and go to drive.google.com. Select the video file you want to work on. When the preview opens, click Open in the top right corner, and Google Vids will start a new project with your video loaded as the first scene. From there, you can trim clips, rearrange sequences, and save your finished video as an MP4 by clicking File, then selecting Download as MP4.
The whole process takes about two minutes if you know where to click. The interface is similar to Google's other workspace tools, so if you've created a presentation in Slides or formatted a document in Docs, the workflow will feel familiar.You're not learning new software; you are just using the skills you already have for collaboration and file management. Additionally, our clip creator tool enhances your video-editing experience by offering greater flexibility and options.
1. Navigate to Your Video File
Start at drive.google.com and find the video file in your folder structure. You can use the search bar if your Drive has many files, or look through folders manually if you've organized content by project or date.Click once on the video thumbnail to open the preview window. The preview shows a play button and basic file details such as size, upload date, and sharing permissions, along with the "Open" button in the top-right corner.
This step assumes your video is already uploaded to Drive in a suitable format. Formats such as MP4, QuickTime, OGG, and WebM can be played without conversion. If you are using formats such as AVI or MKV, you will need to convert the file before Google Vids can process it.Keep in mind that upload speed depends on your file size and internet connection. For example, a 500MB clip might take about five minutes on a standard connection, while a 2GB file could take up to twenty minutes.
2. Launch Google Vids and Load Your Scene
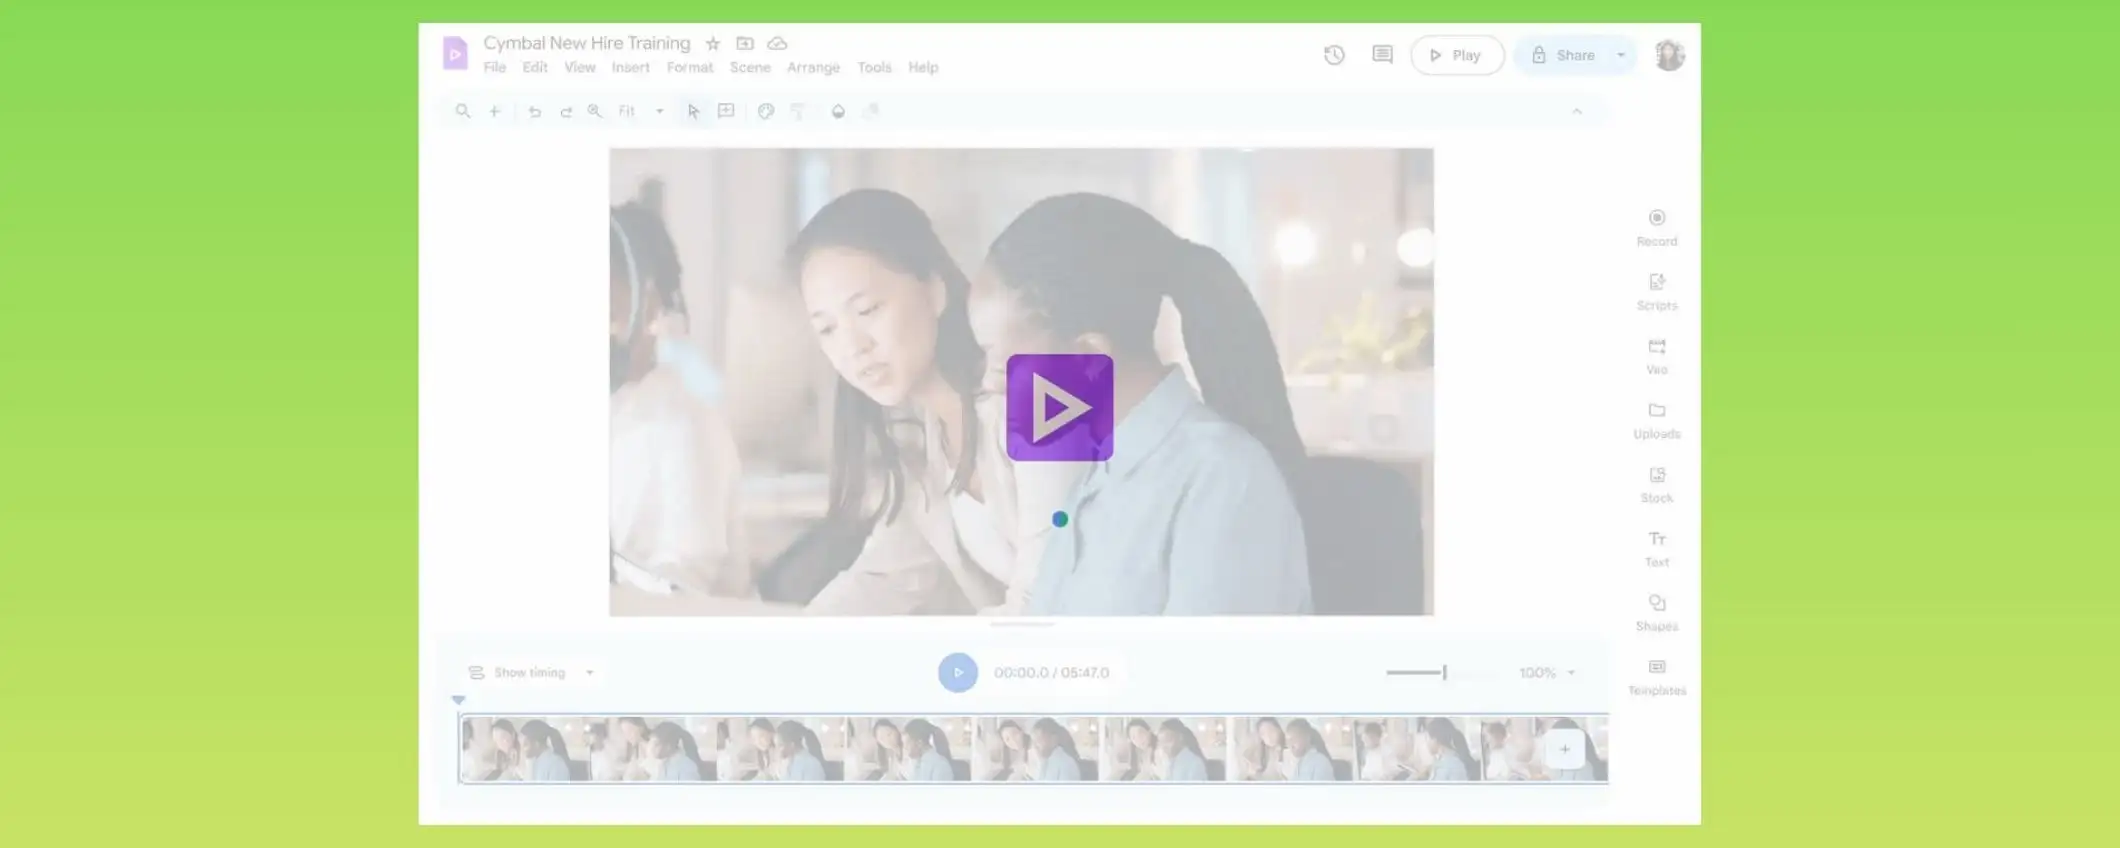
Click the Open button to open a new browser tab to Google Vids. Your video shows up as the first scene in a horizontal timeline at the bottom of the screen.The main canvas displays a preview of your footage, while the right sidebar provides options to add text, music, or additional scenes. The timeline uses a drag-and-drop interface, so you can click and hold on your clip to move it if you add more footage later.
The tool automatically saves your project to Drive every few seconds, so you won't lose progress if your browser crashes or if your internet connection drops. This autosave feature is more important than it seems.When editing against a deadline, if your laptop battery dies, reopening the project brings you back to the exact frame where you paused. There are no manual saves and no version confusion.
3. Edit Your Video Content
You can trim your clips by clicking on the clip in the timeline and dragging the blue handles at the start or end to shorten the footage. For instance, if your video has 30 seconds of setup before the main content begins, you can trim it by dragging the left handle to the point where the relevant action starts. The same idea works for removing dead space at the end. Text overlays can be added through the sidebar menu, where you can type captions, choose font styles, and place the text anywhere on the canvas.
Adding background music requires you to upload an audio file from your Drive or select one from Google's limited stock library. You can't change the volume levels for different parts of the clip separately. If your voiceover gets too quiet because of the music at a certain moment, you'll have to edit the audio file on its own before bringing it in.This issue is especially clear when you want to speak over background music. The tool treats audio as a single layer rather than a mixer with separate controls.
The real bottleneck appears when making content for different platforms. Vertical video is needed for TikTok, square format for Instagram feeds, and horizontal for YouTube. Each format requires a new project in Google Vids because the tool doesn't automatically adjust aspect ratios.Users have to manually crop, reposition text overlays, and re-export for each platform. When posting the same clip on three platforms, the same formatting steps must be done three times. The hard part isn’t editing itself; it comes from reformatting, turning a five-minute task into a twenty-minute process.
The usual way to handle this is to do it manually, since Google Vids is already set up with your file storage. You trim, add text, export, and then go to the next format.As the content schedule increases from one video per week to five, the hours spent on formatting can accumulate faster than the hours spent on creative work. More time is spent adjusting aspect ratios than finding clips that actually perform.
How do AI tools simplify video editing?
Tools like Crayo's clip creator instantly handle formatting and adjustments across platforms. Instead of exporting three separate files and manually moving captions for each size, the tool creates optimized versions in seconds. These versions include subtitles, effects, and sizes optimized for TikTok, Instagram, and YouTube.This helps creators focus on selecting the right clips and trends, while the AI handles the technical aspects that typically take hours in basic editors.
4. Export and Save Your Finished Video
Click "File" in the top left corner, then select "Download as MP4" to save your edited video to your computer. The export process takes anywhere from thirty seconds to several minutes, depending on your video length and resolution. A two-minute 1080p clip usually exports in under a minute.However, a ten-minute video at 4K resolution might take five minutes or more. The file downloads directly to your default download folder. After downloading, you'll need to manually upload it to social platforms or email it to your collaborators.
Google Vids doesn't offer batch export options. This means that if you've created multiple versions of the same video for different platforms, you'll need to download each one individually.The exported file keeps the same resolution and quality as your original upload. This means that if you started with a compressed phone recording, the final output won't magically become clearer. The tool keeps what you bring to it, but it won't improve footage shot in poor lighting or stabilize shaky camera work.
The limitations of the process often become clear only when users are deep into a content schedule.
Related Reading
- Types of Video Editing
- Long Does It Take to Edit a YouTube Video
- How Long Does It Take to Edit a Music Video
- What Is an Overlay in Video Editing
- Is CPU or GPU More Important for Video Editing
- Can I Edit a YouTube Video After Posting
- Is Video Editing a Good Career
- Beginner’s Guide to Video Editing
- Video Editing Basics
Problems With Google Vids Tool
Google Vids struggles in three critical areas for creating content regularly. It assumes users know about video production terms and processes; it provides output that seems okay but is not very polished; and your results depend a lot on how well you can get the Gemini AI engine to work with the right prompts. These problems aren't minor; they create challenges for creators who must publish frequently and compete for attention on platforms where quality continues to improve.
The tool is advertised as beginner-friendly, but it still requires an understanding of concepts such as storyboarding, scene composition, and prompt engineering. You're expected to know what makes a good sequence before you can put one together. If you've never considered pacing, visual hierarchy, or how text placement affects readability on mobile screens, you'll end up searching for tutorials instead of editing your videos.
The interface does not help users make decisions. It shows options but doesn't explain when to use them or why one choice might be better than another for different types of content. For instance, you can add text overlays, but the tool won't recommend the best placement based on where viewers naturally look on vertical video.You can trim clips, but there's no guidance on whether your cuts keep the story flowing or lead to sudden breaks in the action. Ultimately, knowing what good looks like is up to you.
What happens when beginners use Google Vids?
When creators who don't know much about video production try to make content in Google Vids, they often end up with technically okay videos that still feel off. The timing can be slow in some places, captions may distract from the on-screen action, and the pacing doesn't match the energy of the platform they're aiming for. The tool doesn't teach users what works; it only executes commands. As a result, the output quality directly reflects the user's existing video knowledge.
The exported videos work well for internal presentations, where the audience focuses more on the message than on appearance. But when creators create demos for potential clients, social media promotional content, or anything that represents a brand publicly, the output lacks the polish that signals credibility. Colors may appear dull due to a lack of grading capabilities.Transitions can feel sudden because users can't control the easing or duration precisely. Audio remains at a single volume level, so quiet passages and loud bursts are delivered with the same intensity.
According to research shared by TechRepublic in 2024, these quality issues can be deal-breakers when teams move from internal communication to external marketing. The same study found that creators typically export from Google Vids and then import their footage into more advanced editing software to add finishing touches that make the content appear professional. This two-tool process defeats the purpose of using an integrated platform in the first place.
How does Google Vids affect your credibility?
The limitation isn't just about looks. When content competes with creators using tools designed for social media success, the difference in visuals becomes a difference in trust. Viewers often skip videos that appear unfinished, even if they contain valuable information.The first three seconds of a video determine whether someone keeps watching, and Google Vids doesn't provide the control needed to make those seconds matter.
Why is the Gemini AI engine inconsistent?
The Gemini AI engine, which helps with scene suggestions and content creation, often yields very different results depending on how you ask. For example, if you request an engaging intro, you might receive standard stock footage with basic text. But if you explain the mood, pacing, and visual style clearly, the results can improve significantly.However, developing effective prompts is a skill in itself, and most users do not learn it until they've spent significant time creating average versions. Using a clip creator tool can significantly help refine these prompts.
What happens to your workflow with Google Vids?
Your storyboard quality, scene selection, and overall feel change with each prompt you give. The AI does not remember your preferences over time or what worked in past projects. Each video starts from scratch.This means you constantly have to explain your creative intent instead of improving a template that already knows your style. The tool treats every project as separate, so the efficiency gains from repeating the same work are never realized.
A common approach is to adjust prompts until the AI produces an acceptable output. Then, you manually fix the pieces that still don't feel right.As your content schedule speeds up, this trial-and-error approach quickly becomes a bottleneck. You end up spending more time coaching the AI than actually creating, and the output still needs cleaning up before it is ready to publish.
Are there alternatives to Google Vids?
Platforms like Crayo's clip creator tool remove the need for prompt engineering. Instead of just describing what you want and hoping the AI understands it, you connect your footage.The system then uses proven templates designed for viral success on specific platforms. The AI handles subtitle timing, effect placement, and aspect ratio formatting based on what truly engages people, rather than on how well you can express your ideas in a text box.
What are the challenges in mastering video production?
These challenges can be addressed by learning the basics of video production, accepting lower-quality content from external sources, or improving prompt engineering.But these solutions assume that a person has the time to become skilled with a tool designed to make things easier.When the goal is to produce more content and find clips that resonate with viewers, spending hours on technical details detracts from what really helps grow an audience.
Which tools should you choose for better results?
The choice isn't about editing in Google Vids or not editing at all; it's about tools that require video expertise and those that let you focus on creative choices. The challenges vary depending on whether you're producing one video per month or five per week.
Knowing the problems is just half the story. The important question is: what really works when you need speed, quality, and consistency without a tough learning curve?
Related Reading
- Video Editing Workflow Checklist
- PC Specs for Video Editing
- How To Start Editing Videos
- How To Practice Video Editing
- Mac Vs Pc For Video Editing
- How To Make A Video Editing Portfolio
- Video Editing Tips And Tricks
- How To Make Money Video Editing
- Best Free Video Editing Apps For Android
- How To Organize Video Files For Editing
- Creative Video Editing Techniques
8 Best Video Editing Tools for Beginners

When starting out, the right video editor removes technical barriers without limiting creative decisions. Beginners need tools that handle common tasks automatically, like captions, transitions, and effects, while still allowing for control over pacing and storytelling.The best options balance simplicity with opportunities for growth, ensuring you won't have to relearn everything six months later as your skills improve.
The tools below cater to different use cases. Some are made for speed and social content, while others focus on teaching professional workflows.A few strike a balance between easy-to-use interfaces and advanced features. Your choice should reflect your goals, whether you're building a portfolio, creating consistent content, or exploring video as a new skill.
1. Crayo
Crayo removes the timeline complexity that often prevents beginners from finishing their first project. Instead of arranging clips on tracks, adjusting keyframes, or manually syncing captions, users start with raw footage and let AI handle the technical formatting.The platform creates polished short-form videos with automated subtitles, effects, and background music in seconds. These videos are specially optimized for TikTok, Instagram Reels, and YouTube Shorts.
The tool is for those who want publishable results right away, without needing to learn video production terms. Users don’t need to know how to apply transitions or change audio levels. They just pick clips, choose a style, and let the system handle pacing, caption timing, and platform-specific formatting.
This method is especially helpful for anyone looking to quickly build a content library or test what resonates with their audience before spending months learning software.
Who can benefit from Crayo?
Beginners who feel overwhelmed by professional software find Crayo easy to use since it removes the learning curve. Users do not need to understand timelines, layers, or manual captioning to create professionally finished content.Short-form content creators focused on platforms such as TikTok, Reels, or Shorts can benefit from templates and pacing designed for vertical, fast-attention formats. In these cases, the first three seconds are crucial in deciding whether viewers continue watching.
Career starters and freelancers use Crayo to quickly build portfolios. Instead of spending weeks learning Premiere Pro to make a few sample videos, users can create dozens of clips in the same time. This lets them practice storytelling without technical challenges. For marketers and solopreneurs, speed and consistency are more important than complex filmmaking.The tool is practical for product clips, promotional shorts, and social campaigns where quantity matters more than artistic control.
What are the advantages of Crayo?
Crayo is very beginner-friendly, making it easy to use without worrying about timelines. The AI automatically creates captions, effects, music, and visuals, so you don’t need to adjust anything by hand. It works quickly, preparing videos in seconds rather than hours. It's designed for TikTok Reels and Shorts, with the right sizes and speeds to match those platforms' requirements.This tool is ideal for quickly assembling a portfolio and showcasing a range of skills without requiring technical expertise. Also, you don’t need advanced editing skills to create publishable content.
2. PowerDirector
PowerDirector balances ease of use with features similar to those in professional software, making it a good choice for beginners looking to advance their skills. You can use keyframed effects, edit footage from multiple cameras, and handle VR content without the complicated interface of Premiere Pro or Final Cut. According to That Creative Hub's 2025 analysis, the software now includes generative AI features like auto-captioning with text-based editing and auto-face-blurring without motion tracking. This eliminates tedious manual tasks that slow traditional workflows.
Who can use PowerDirector effectively?
Business video producers need polished presentation videos for proposals and internal communication. They also want to avoid long training sessions. PowerDirector provides essential tools, including background music, intros, outros, text overlays, and color corrections. These tools help make content look polished rather than rushed.Video lovers who want to improve home videos for family sharing value the software's mix of ease and control. YouTubers also benefit a lot from AI video and audio generation tools and the included stock media. This is especially important when hiring actors or renting studio space is not possible.
What are the pros and cons of PowerDirector?
Fast project rendering keeps up with tight deadlines. A clear, easy-to-use interface makes learning easier without sacrificing power. Plenty of effects and AI tools help automate repetitive tasks.Multicam and motion tracking support broaden creative options as skills get better. Built-in screen recording makes tutorial and demonstration workflows smoother.
However, the large number of options can overwhelm beginners while they work on their first few projects. Also, subscription costs can add up over time compared with one-time purchase options.
3. Apple iMovie
iMovie simplifies video editing by providing essential tools in an interface that feels familiar to anyone who has used Apple software. The Storyboard features help users create interesting sequences from scratch, which is very useful when you're not sure how to organize a story. If you are filming with an iPhone, iMovie keeps proprietary Cinematic mode effects in the footage, maintaining depth-of-field adjustments that other editors might lose during import.
The app offers advanced tools such as audio filters, chroma keying, and picture-in-picture, without hiding them in complex menus. Moving up from iMovie to Final Cut Pro is easy, as the logic and terms are similar. This means that users do not start from nothing when they move beyond this beginner tool.
Who is iMovie intended for?
Family video sharers using Apple devices find iMovie useful for creating vacation clips, soccer matches, and event compilations for relatives rather than for public audiences.Video hobbyists have a wide range of editing tools and effects to keep them engaged as they learn the basics. In addition, the app acts as a bridge to Final Cut for those who want professional features later on without leaving the Apple ecosystem.
What are the advantages and drawbacks of iMovie?
iMovie has a simple interface, which makes it easier for new editors to use. It's a good chroma-keying tool that lets you create green-screen effects without requiring expensive software.It also includes special support for iPhone video, preserving the quality and effects of videos shot on mobile devices. Great movie templates and shot guidance help beginners learn about structure and pacing.
However, iMovie lacks multicam and motion tracking features that may be needed for more advanced projects. It is also limited to two video tracks, which makes it harder to layer and create complex compositions.
4. Adobe Premiere Pro
Premiere Pro sets the industry standard for professional video editors by offering essential collaboration tools, advanced color grading, effects, and flexible output options that studios rely on. Recent updates have added features such as AI audio auto-tagging, auto-captioning, text-based video editing, and a unified Color Manager. It also allows video clips to be extended using generative AI. The import and export processes are now easier to use, making it easier for new users to get started in a professional setting.
Who should consider using Premiere Pro?
Collaborators working with teams that use other Adobe Creative Cloud applications benefit from seamless integration with tools like Photoshop, After Effects, and Audition.
Professional video editors require the necessary tools and compatibility with workplace systems; Premiere dominates.
Serious amateurs looking to advance beyond basic apps will find streamlined interfaces for getting started and sharing projects, even without prior studio experience.
The latest update introduces support for 360 VR media, including cutting, effects, titles, and transitions.
Note that you'll need stitched 360 clips rather than stereoscopic 180-degree ones.
What are the pros and cons of Premiere Pro?
Premiere Pro has a clear, flexible interface that adjusts to different workflows. Its responsive performance and quick rendering keep up with even the most challenging projects. Automated transcription and text-based editing are updating traditional workflows. A great stabilization tool fixes shaky videos without needing plugins.You can use unlimited multicam angles for complex productions, and a range of organization and collaboration tools make team projects easier.
However, some techniques require additional applications, such as After Effects or Audition. Also, subscription costs can add up faster than the cost of buying software once.
5. Final Cut Pro
Final Cut Pro features a modern, trackless timeline. This design might feel confusing at first, but it becomes flexible and easy to understand once users learn its magnetic editing logic. The app offers capabilities similar to Premiere Pro but also includes a more traditional interface for users who prefer standard tracks.The iPad version works well with the desktop application and costs $4.99 per month. It supports multicam editing and lets users sync projects across their devices.
This tool is ideal for those already in Apple's ecosystem who want professional results without learning Adobe's terminology and workflow.
Who is Final Cut Pro suitable for?
Amateur video enthusiasts familiar with iMovie who want more advanced features will find Final Cut Pro's logic welcoming. Apple product users who work across iPads, iPhones, Macs, and Vision Pros receive additional support for device input and output, including Vision Pro. Pro video editors will find everything they need, including support for plugins. Several top Hollywood movies and shows have been produced entirely in Final Cut.
What are the pros and cons of Final Cut Pro?
Superb organization tools keep large projects manageable. Fast performance handles 4K and high-resolution footage smoothly. The magnetic, trackless timeline offers flexibility once users adapt to the workflow.It supports 360-degree footage and wide color spaces for advanced projects. Excellent multicam editing makes complex shoots simpler, while powerful masking and chroma keying are as good as dedicated compositing software.
The import and export processes could be clearer for beginners. Some techniques require additional software, such as Motion and Compressor, which adds cost and complexity.
6. Adobe Premiere Elements
Premiere Elements makes complex effects easy to use with Guided Edits and simple features that hide advanced tools behind beginner-friendly interfaces. Users can get great results without worrying about keyframes and timecodes, though these options are still available if needed.Now, a license limits use to three years rather than being unlimited, but it still costs less than a full Premiere Pro subscription for the same period. The software works on both macOS and Windows.
Who is Premiere Elements designed for?
Aspirants to Premiere Pro often see Elements as a lower-cost stepping stone to learn Adobe's logic and terminology. Beginners in video editing can create compelling videos with engaging effects without investing much time in professional software.Memory keepers, or people preserving family events and trips, can achieve quality results to share with relatives, all without experiencing major technical difficulties.
What are the advantages and limitations of Premiere Elements?
The interface resembles Premiere Pro, making it easier for users to switch to this program. It offers a wide range of video effects and control options, balancing ease of use with powerful features. Additionally, it works on both Mac and Windows.The program also includes 360 VR editing tools for creating immersive content and delivers good rendering speeds that can handle moderate project needs.
Even with these benefits, the license term is three years, so you will need to purchase it again after it expires. Additionally, the absence of multicam support makes it less effective for complex shooting scenarios.
7. DaVinci Resolve
DaVinci Resolve offers high-end capabilities with a generous free version that attracts both amateurs and professionals. Its node-based editing workflow gives you ultimate control over effects. The software offers advanced tools for audio, color grading, and keyframing that rival paid options.Recent updates include AI features such as auto-captioning and text-based editing that mirror Premiere Pro's automation. Even though it takes time to learn, these features make the investment worthwhile for those serious about professional work.
Who is DaVinci Resolve aimed at?
Hollywood wannabes and studio professionals find Resolve popular in the industry, especially for its teamwork tools, which are essential for group projects. Its wide use in professional settings makes it valuable for aspiring editors to learn.Video editors on a budget benefit greatly from the free version's features, since no comparable alternatives offer such capabilities. Please note that some features are only available in the paid version.
What are the pros and cons of DaVinci Resolve?
DaVinci Resolve offers a wide range of editing tools for precise control over every aspect of production. It includes motion graphics and audio editing in a single application, and its powerful color-grading tools rival those in specialized color correction software. Additionally, AI features automate routine tasks, while its fast rendering performance efficiently handles complex projects.
However, DaVinci Resolve requires significant system resources, making it difficult to run on older computers. Also, it takes more time to learn than beginner-focused alternatives.
8. Microsoft Clipchamp
Clipchamp is the default Windows video editor and is available on all major platforms via a web browser. This tool can handle simple tasks, such as joining clips, and more advanced tasks, such as adding effects, captions, and background music.It's great for screen recordings, whether you use a webcam narration or not. Templates for intros and outros help make projects look neat and organized.
AI-powered speech-to-text auto-captioning and AI voice-overs that turn captions into dialogue in various styles are useful features that save time. Most features are free, but a subscription provides additional benefits, including cloud storage, expanded stock content, brand kit features, and 4 K output resolution to 4K.
Who can utilize Clipchamp?
Web-based video editors that don't require installation can be used directly in a browser on macOS or Windows. Windows PC users will find Clipchamp ready for quick video editing, as it integrates well with the OS's photo and screen capture tools. It also allows for direct screen and webcam recording.Marketers use brand kits, templates, and stock media to enhance their content. Plus, social creators posting to Facebook, Instagram, TikTok, or YouTube find templates and stock content helpful for creating eye-catching videos.
What are the pros and cons of Clipchamp?
Clipchamp is included with Windows at no additional cost. Its smooth interface feels modern and fast. A wide choice of templates helps speed up common projects.Also, stylish effects and transitions improve production quality. Good text and music options add to the overall polish.
On the downside, some features need a subscription, which limits free features. The templates are usually short and do not say what shot types to use, so users need to adjust them. Additionally, there is less control over effects than with professional editors.
Choosing the right tool is just the first step in growing content production. It helps prevent feeling overwhelmed by technical details.
Still Editing Videos Through Google Drive Workarounds? There's a Faster Way
If you're uploading videos to Google Drive just to trim, download, re-edit, and re-upload, you're wasting hours on a workflow that Google Drive was never designed for. Crayo replaces that entire process by turning prompts into fully edited, captioned, Shorts-ready videos. There are no storage hacks, no extra tools, and no back-and-forth.
Many users rely on Google Drive because it's easy to access and works well with their workspace. You trim a clip, export it, and then find out the captions need repositioning. After uploading it again, you adjust the aspect ratio for a different platform, only to repeat the process.Each cycle takes about fifteen minutes, which adds up with every video you make. When creating content for three platforms with different format needs, this workflow can turn a twenty-minute project into over an hour of reformatting.
Crayo simplifies the process by eliminating formatting and technical issues that often slow down storage-based editing. Instead of manually trimming each clip and typing captions frame by frame, the platform creates polished short-form videos with automated subtitles, effects, and aspect-ratio adjustments optimized for social media algorithms. You can move from idea to finished video without leaving one platform, without downloading extra files, and without having to sync captions to dialogue on your own.The system handles the tedious steps that can take hours in basic editors, allowing you to focus on finding the right clips and trends rather than struggling with export settings. Start free and see how quickly you can transition from raw footage to published content with a tool designed for your goals.
Related Reading
- Best Drone Video Editing Software
- Best Video Editing Software For Music Videos
- Best Video Editing Software For Sports Highlights
- Best Video Editing Software For Content Creators
- Best Video Editing App For Pc
- Best Paid Video Editing Software
- Best App for Video Editing on iPad
- Best Songs For Video Editing
- Best Video Editing Software For Vlogging
- Autopod Alternative