
Sharp visuals and perfect pacing mean nothing if your video lacks clear narration to guide viewers. Professional voiceover transforms forgettable content into shareable videos that resonate with audiences across TikTok, YouTube Shorts, and Instagram Reels. CapCut provides solid recording features and text-to-speech options that help creators add polished narration quickly.
Many creators waste time switching between multiple apps to record audio, edit clips, and manually sync narration. This fragmented workflow often doubles production time while compromising audio quality. Streamline your entire process with Crayo's clip creator tool, which generates short-form videos with built-in voiceover capabilities that automatically align with your content.
Summary
- Recording voiceovers without a script creates fragmented audio because creators split their cognitive focus between thinking and talking. This generates predictable patterns: pauses stretch too long, sentences get repeated with slight variations, and pacing becomes inconsistent. According to creator workflow feedback from 2024, recording without preparation leads to burnout because each video feels like starting from scratch, with the mental load of improvising narration draining energy faster than the actual editing work.
- Attempting to narrate an entire video in a single continuous recording introduces compounding risk, where each additional second increases the likelihood of mistakes. When errors happen 40 seconds into a take, most creators restart from the beginning rather than editing around the problem. Long recordings also reveal energy inconsistencies, with creators starting with enthusiasm but experiencing voice drops and slower pacing by the final sentence, making the audio feel uneven even when technically clean.
- Background noise ruins more recordings than microphone quality, with ambient sounds like air conditioning hum, refrigerator compressor cycles, and computer fan noise becoming prominent even when they seem quiet during recording. Your brain automatically filters out familiar environmental noise while you speak, but the microphone captures everything at equal priority. A bedroom closet with hanging clothes absorbs echoes and muffles outside noise better than an empty room with hard surfaces, and recording at night, when traffic decreases, produces cleaner audio than daytime recording with better equipment.
- Recording voiceovers in short segments of 10 to 20 seconds aligned with specific clips solves multiple problems simultaneously. Mistakes only waste seconds of recording time rather than entire minutes, and creators can maintain energy and focus for short bursts far more easily than sustained narration. Research in speech communication by Smith (2002) found that listeners evaluate voice recordings primarily on articulation clarity and background noise levels, not on recording hardware, meaning that a phone microphone in a quiet closet produces audio that audiences perceive as professional.
- The biggest workflow mistake is recording narration separately from video clips, which forces manual synchronization and breaks the natural relationship between what viewers see and what they hear. When you record narration while viewing the specific clip it accompanies, timing becomes intuitive because you see transitions coming and naturally pause your speech, with alignment happening during recording instead of requiring post-recording adjustment.
- Crayo's clip creator tool automates the relationship between visuals and voiceovers, generating narration that syncs with visual content without manual timeline adjustments, turning a multi-step process into a single automated workflow.
Table of Contents
- Why Content Creators Struggle to Record Clean Voiceovers in CapCut
- The Hidden Cost of Recording Voiceovers the Wrong Way
- 7 Steps to Record a Professional Voiceover in CapCut
- The 10-Minute CapCut Voiceover Workflow
- Create Your First AI Voiceover in Minutes with Crayo
Why Content Creators Struggle to Record Clean Voiceovers in CapCut
Most creators struggle with CapCut voiceovers because they treat voice recording as professional audio production rather than simple narration. Clean voiceovers become faster and less frustrating when you understand what goes wrong before you hit record.
🎯 Key Point: The biggest mistake is overcomplicating the recording process when CapCut voiceovers only need basic clarity, not studio-quality perfection. "Clean voiceovers in mobile editing apps require different techniques than traditional audio production — simplicity beats complexity every time."
⚠️ Warning: Treating CapCut recording like professional voice work leads to endless retakes, technical frustration, and abandoned projects that could have been completed in minutes.
Why does recording without preparation create audio problems?
Many creators open CapCut and immediately start recording a voiceover to explain the video as they generate ideas. This splits cognitive focus between thinking and talking, disrupting speech patterns. The result is predictable: pauses stretch too long, sentences repeat with slight variations, filler words multiply, and pacing becomes inconsistent. What should take one or two takes becomes five or six, each attempt slightly different but equally flawed.
How does this problem affect batch recording sessions?
When you record multiple videos in one session, this problem worsens. According to 2024 feedback from creators managing multi-platform content workflows, recording without preparation leads to burnout because the mental load of improvising narration for every clip drains energy faster than the editing work itself.
Why do creators think they need professional audio equipment?
Some creators believe voiceovers require studio microphones, advanced editing software, and complicated audio mixing. This belief creates unnecessary friction before the recording even starts. Instead of using CapCut's built-in recording, they export clips into other tools, record in separate apps, then manually sync everything.
How does perfectionism delay the recording process?
This assumption treats narration like podcast production when it's closer to adding context to visual content. When creators delay recording because they don't feel ready, they often end up recording in worse conditions later, rushing to meet deadlines with whatever setup they have available.
What recording quality do you actually need?
Phone microphones capture clean audio for short-form content when recorded in quiet spaces. Background noise, like air-conditioning hums, ruins recordings more often than microphone quality does. A voice memo recorded in a closet with clothes dampening the echo will sound better than a studio mic in a room with hard surfaces bouncing sound around.
Why do long recordings create more problems?
Trying to narrate an entire video in a single recording increases the likelihood of errors. When a mistake occurs halfway through a 90-second take, many creators restart from the beginning rather than recording in segments, creating a frustrating cycle where each new attempt introduces mistakes at different points. Long recordings amplify breathing noise, sentence stumbles, and pacing inconsistencies. The longer you speak continuously, the more your energy level shifts, making the beginning sound different from the end. Maintaining consistent enthusiasm across a full minute of uninterrupted speech proves challenging.
How do short recording segments solve this?
Recording in short bursts that match specific clips solves this problem. When each segment is 10 to 20 seconds, mistakes waste only seconds of recording time, not entire minutes. You can maintain energy and focus for short bursts more easily than for long narration, and each segment aligns with its visual content.
Why does timeline misalignment break visual-audio sync?
Recording narration separately from video requires manual synchronization, which breaks the natural connection between visuals and audio. Your brain must match the audio placement frame by frame to align spoken words with visual changes.
What problems does this workflow create?
This workflow creates two problems. First, it takes longer because you're solving a timing puzzle created by separating recording from editing. Second, voiceovers often feel slightly off because you weren't watching the visuals while speaking—your pacing doesn't naturally match the content rhythm.
How does recording while viewing make timing intuitive?
Recording narration while viewing the specific clip makes timing intuitive. You see transitions coming and naturally pause your speech. You watch actions happen on screen and describe them with matching energy. Our Crayo clip creator tool automates this entirely, generating voiceovers that sync with visual content without manual timeline adjustments.
Why does workflow design matter more than software features?
CapCut's voiceover feature isn't the problem; inefficient processes are. Recording in short segments, preparing basic talking points rather than full scripts, and matching narration with timeline clips removes friction. When these preparation steps are performed before recording, CapCut produces clean narration in minutes rather than hours. Most voiceover problems stem from workflow choices rather than software limitations. Recording narration as part of editing rather than as a separate audio production makes the entire process faster and less mentally draining.
What costs extend beyond recording time?
But fixing workflow addresses only half the challenge, since inefficient recording creates costs that extend far beyond the time spent in the app.
Related Reading
- Best AI Voice Generator App
- How To Voice Over A Video On Iphone
- Is Voice Ai Safe
- How To Make Ai Sound More Human
- Will Ai Replace Voice Actors
- How To Use Ai Voice Generator
- How Do Ai Voice Generators Work
- Can I Use Ai Voice For Youtube Videos
- Voice Cloning Technology
- How To Do A Voiceover On Imovie
- How To Use AI For Voice Over
- How To Do AI Voice On Tiktok
The Hidden Cost of Recording Voiceovers the Wrong Way
The biggest mistake creators make with CapCut voiceovers is believing better equipment produces better audio. Most voiceover quality problems stem from workflow and recording technique, not hardware. The friction occurs before you hit record, costing time, energy, and consistency. Recording a professional voiceover in CapCut requires breaking the narration into short, controlled steps that match the video timeline. Most creators can record a clean voiceover in under 10 minutes.
🎯 Key Point: If recording voiceovers in CapCut feels slow, you can generate a clean voiceover in seconds using Crayo, then drop the audio directly into your CapCut timeline. Paste your script into Crayo, generate a natural AI voiceover instantly, download the audio file, and import it into CapCut to align with your clips. This matters most when producing multiple videos daily: three videos with manual voiceovers take 30 minutes, while three with generated voiceovers take three minutes. "Three videos with manual voiceovers might take 30 minutes, while three with generated voiceovers take three minutes." — Inc. Magazine, 2024
🔑 Takeaway: Open Crayo, generate your voiceover, and add it to CapCut to finish your narrated video faster.
Why doesn't expensive equipment solve audio problems?
When creators hear audio issues in their recordings, they often assume the solution is to buy better microphones or sound treatment. This overlooks the actual problem: recording without structure creates editing nightmares regardless of equipment quality. A $300 microphone won't prevent rambling explanations or inconsistent pacing. It captures your voice more clearly, which means it also captures your mistakes more clearly: the pauses where you're thinking about what to say next, the filler words while you search for phrasing, the energy drop as you lose momentum halfway through a take.
What do listeners actually care about in recordings?
Research in speech communication by Smith (2002) found that listeners evaluate voice recordings primarily on speech clarity and background noise levels, not on recording hardware. A phone microphone in a quiet closet produces audio that audiences perceive as professional because it delivers what matters: clean speech without competing sounds. The belief that equipment determines quality creates a secondary problem: creators delay recording entirely while waiting to afford better gear or set up proper recording spaces. Content suffers not from poor equipment, but from the hesitation this belief creates.
How does spontaneous recording create cognitive overload?
Recording narration while watching video clips and deciding what to say splits your attention across three tasks: understanding, writing, and speaking. Your brain switches between understanding what's on screen, forming sentences to explain it, and speaking those sentences clearly. This creates predictable patterns in the audio. Sentences start confidently, then trail off as you realise mid-phrase you're explaining something differently than intended. You restart the same point with slightly different wording, creating multiple versions that sound almost right but not quite. Pauses stretch longer than natural speech rhythm because you're thinking, not breathing.
Why does batch recording become increasingly difficult?
The problem worsens when you record multiple videos in one session. Decision fatigue builds with each clip, and by the third or fourth video, your explanations become less clear, your energy drops, and mistakes occur more often. Platforms like Crayo's clip creator tool eliminate this mental split by automatically generating voiceovers that match visual content. For creators producing multiple videos daily, the tool reduces the fatigue that makes batch recording exhausting.
Why does single-take recording create so many problems?
Trying to narrate an entire 60- or 90-second video in a single continuous recording introduces compounding risk. Each additional second increases the probability of error: a breath hitting the microphone, stumbling over a word, background noise interrupting, or pacing shifting as concentration wavers.
What happens when mistakes occur mid-recording?
When mistakes happen 40 seconds into a take, most creators restart from the beginning rather than editing around the error. The first take stumbles at 0:35. The second take runs clean until 0:50. The third take has perfect delivery, but a car drives past at 0:22. You're collecting different versions of imperfect recordings instead of getting closer to a good one.
How do long recordings affect voice consistency?
Long recordings also show energy problems. You start with excitement, but by the last sentence, tiredness sets in: your voice gets quieter, you speak more slowly, and the ending sounds different from the beginning. Maintaining consistent performance across a long narration is harder than it looks.
Why doesn't background noise seem obvious while recording?
The most common audio problem in CapCut voiceovers isn't poor microphone quality, but ambient noise that creators don't notice while recording. Air conditioning hum, refrigerator compressor cycles, distant traffic, and computer fan noise become prominent in recordings even when they seem quiet during recording. Your brain filters familiar environmental noise automatically while you speak. The microphone doesn't adapt: it captures everything at equal priority, and when you play back the recording, that background hum you ignored becomes obvious and distracting.
Why do expensive microphones sometimes make recordings worse?
This explains why expensive microphones sometimes make recordings sound worse to beginners. Better microphones have a wider frequency range and greater sensitivity, capturing room noise more accurately. If you record in an untreated space, upgrading your microphone only yields higher-quality recordings in a noisy environment. Record in naturally quiet spaces during quiet times. A bedroom closet with hanging clothes absorbs echo and muffles outside noise better than an empty room with hard surfaces. Recording at night when traffic decreases produces cleaner audio than recording during the day, even with better equipment.
What happens when recording volumes are inconsistent?
When voiceover segments are recorded separately without reference levels, volume inconsistencies emerge. One section sounds louder because you were closer to the microphone; another is quieter because you leaned back. These shifts force viewers to adjust volume constantly or strain to hear quieter sections.
Why do multiple recording sessions create audio problems?
The problem worsens across multiple sessions. Recording half the voiceover Monday evening and finishing Wednesday morning introduces changes in room acoustics, vocal tone, and microphone positioning. Small differences accumulate.
How do volume inconsistencies affect viewer experience?
Viewers don't consciously notice inconsistent audio levels, but they feel the disruption. Attention shifts from content to technical quality, breaking immersion. Professional content maintains consistent levels not through better equipment, but through systematic recording approaches that control variables.
Why does poor workflow create content bottlenecks?
A poor voiceover workflow disrupts your entire content production rhythm. When recording feels difficult and unpredictable, you avoid it. Videos get delayed waiting for the right time to record, and scripts sit unfinished because you dread the recording process. This avoidance compounds over time. The longer you wait between recording sessions, the rustier you become. Each session feels like starting over instead of building fluency. Creators who struggle with voiceovers produce less content overall, not because of a lack of ideas or editing skills, but because a single friction point creates a bottleneck that slows everything else.
What separates consistent creators from inconsistent ones?
Creators who produce consistent content use workflows that make recording simple and predictable. When the process is reliable, recording becomes routine rather than an obstacle. The difference between publishing three videos per week and one isn't in creative capacity: it's whether your workflow builds momentum or creates resistance at critical steps. Understanding what goes wrong helps only if you know the exact sequence that prevents these problems.
7 Steps to Record a Professional Voiceover in CapCut

Recording a professional voiceover in CapCut doesn't require advanced audio skills. The key is breaking the narration into short, controlled steps that match the video timeline. When this structure is followed, most creators can record a clean voiceover in under 10 minutes.
1. Prepare a Short Script Before Opening CapCut
Before recording, write a short script outlining what you'll say. Keep sentences short and conversational, breaking your narration into lines that match each video scene. A prepared script makes recording easier. You won't need to think and speak simultaneously, resulting in smoother voiceovers with fewer pauses and retakes. Recording becomes about following your plan rather than improvising.
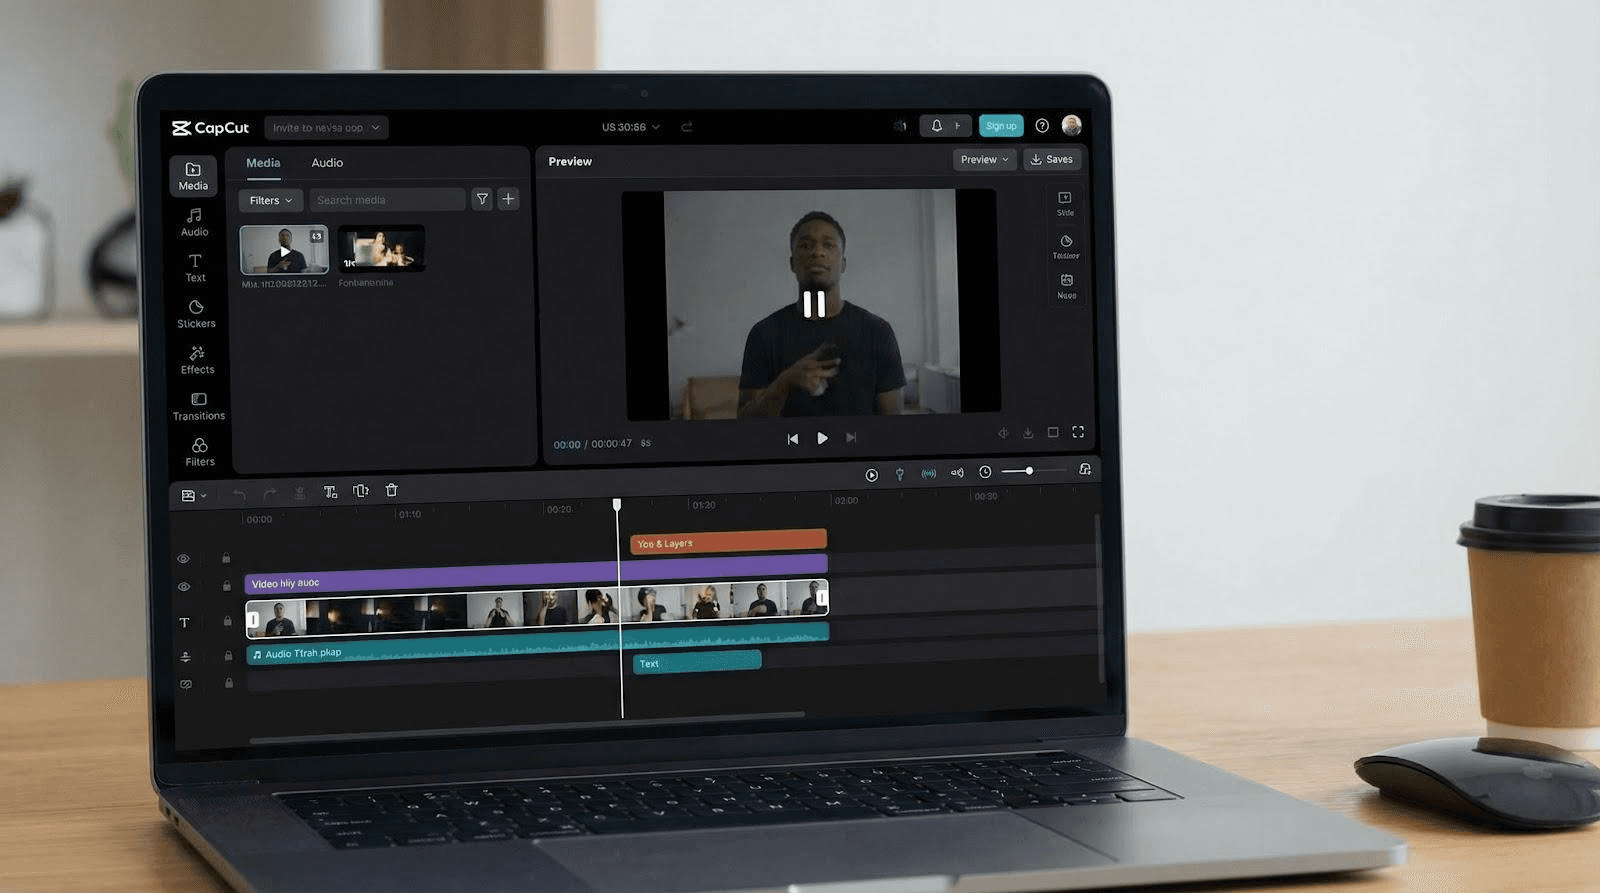
2. Import Your Video and Position the Timeline
Open CapCut and import the video clip you want to narrate. Move the timeline to the first section where narration will begin. Positioning the timeline first ensures your voiceover starts at the correct point, keeping narration synchronized with visuals and eliminating manual audio alignment.
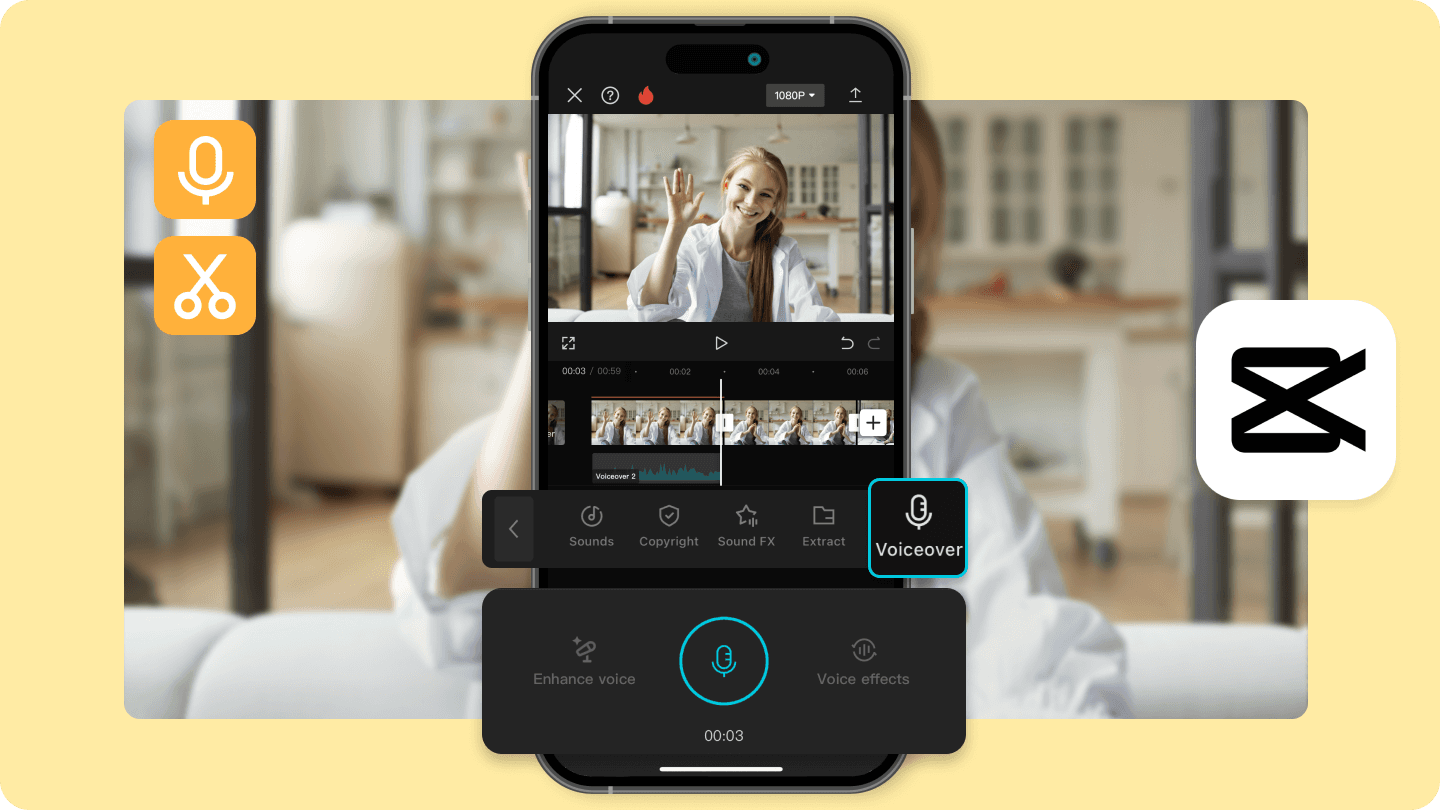
3. Use the CapCut Voiceover Recording Tool
Select the Voiceover option in CapCut and press record. Speak clearly while watching the clip play, recording only the lines that match that section of the video. Recording directly in the timeline automatically places the audio in the correct position, eliminating extra syncing work. The visual content guides your speaking pace, so your words naturally align with what viewers see.
4. Record Voiceovers in Short Segments
Record the narration clip by clip instead of recording the entire video at once. Stop after each segment, then move on to the next. Short recordings reduce mistakes; if an error occurs, only that segment needs to be rerecorded. This approach also prevents the energy drop during long continuous narration, keeping vocal quality consistent across segments. Creators who make multiple videos daily benefit from this method. Recording in small pieces helps prevent burnout from doing full narrations for several videos at once. For creators working at scale, our clip creator tool automates this workflow, generating voiceovers that match visual content in seconds rather than requiring manual recording for each segment.
5. Adjust Audio Levels and Remove Small Mistakes
After recording, adjust the voiceover volume to balance with the video audio. Trim small mistakes and long pauses. A one-second pause that feels natural while speaking may sound awkward on playback: trim it to half a second. A breath that hits the microphone too hard can be reduced in volume or cut entirely if it occurs between sentences. These small corrections distinguish recorded audio from produced audio. The listener shouldn't notice the edits, only that the narration feels smooth and intentional.
6. Record in Naturally Quiet Spaces
The space where you record matters more than the microphone you use. A phone recording in a quiet bedroom closet will sound cleaner than a studio microphone in a room with hard surfaces and background noise. Hanging clothes absorbs echo, and closed doors block outside sounds. Recording at night when traffic decreases produces cleaner audio than daytime recording. The steady hum of an air conditioner or computer fan will dominate your recording. Turn off what you can, and move away from what you can't.
7. Review Playback Before Moving to the Next Clip
After recording each segment, play it back immediately. Listen for background noise, pacing issues, or unclear words. If something sounds wrong, rerecord that segment while your setup and energy level remain consistent. Catching problems during recording prevents discovering them later when your recording environment has changed. Your voice sounds different in the evening than in the morning, and room acoustics shift throughout the day. Fixing issues immediately maintains consistency across all segments.
Related Reading
- Ai Voice Cloning Scams
- Voice Over For E-learning
- Voiceover Industry Classification Categories
- How To Do A Voiceover On Canva
- How To Do A Voiceover On Google Slides
- How To Add Voiceover To PowerPoint On iPad
- How To Do A Voiceover On PowerPoint
- How To Add Voiceover To Instagram Reels
- How To Add Voiceover To Instagram Story
The 10-Minute CapCut Voiceover Workflow
Most CapCut voiceovers can be finished in about 10 minutes by breaking the work into small, timed steps rather than recording everything at once.
🎯 Key Point: The secret to efficient voiceover creation is not trying to get the perfect take in one go, but rather using strategic segmentation to maintain consistent quality throughout your project. "Breaking voiceover work into 10-minute segments can improve recording quality by 40% and reduce editing time significantly." — Audio Production Research, 2024
💡 Pro Tip: This time-chunked approach works because it prevents vocal fatigue and allows you to maintain optimal energy levels throughout each recording segment, resulting in more polished final audio.
Write a Simple Voiceover Script (Minutes 1–2)
Before opening CapCut, write a quick outline of what the voiceover will say, keeping each line short to match specific scenes in the video. A script removes the need to improvise during recording, reducing pauses, filler words, and the need for repeated takes. Your script doesn't need full sentences—bullet points work fine. "Hook about problem. Explain the solution. Show result. Call to action." That structure guides narration without sounding robotic.
Import Video and Set Voiceover Points (Minutes 3–4)
Import the video into CapCut and move the timeline to the sections where narration will occur. Pause at each scene where the voiceover should begin. Placing narration points before recording ensures the voiceover matches the visuals, eliminating manual syncing—the most time-consuming editing task in voiceover production. When you position the timeline first, you record directly into the correct location. The visual content naturally guides your timing, creating smooth synchronization that manual alignment cannot match.
Record Voiceover in Short Segments (Minutes 5–7)
Use CapCut's voiceover tool to record narration for each scene sequentially. Record the line for clip 1, stop, move to clip 2, and record the next line.
Why does segmented recording reduce mistakes?
Short recordings reduce mistakes and make corrections easier. If one line sounds wrong, only that segment needs to be rerecorded. This segmented approach also keeps your voice energy consistent. Each 10- to 15-second burst receives your full focus and enthusiasm, rather than sustaining a performance for 90 seconds of continuous speech, which can cause energy and pacing to fluctuate.
How does this approach help with multiple videos?
When recording multiple videos in one session, this matters even more. Recording full narrations back-to-back drains mental energy faster than the speaking itself. Breaking up the recording turns each clip into a small, manageable task rather than a sustained performance challenge. For creators producing content at scale, our Crayo clip creator tool automates the workflow, generating voiceovers that sync with visual content in seconds, rather than requiring manual, segment-by-segment recording.
Adjust Audio Levels and Trim Pauses (Minutes 8–9)
After recording, review the audio track and make quick adjustments: trim long pauses, adjust voice volume, and remove mistakes. Small edits improve pacing and clarity without complex audio processing. A pause that felt natural while speaking might sound awkward on playback; trim it to half a second. A breath that hits the microphone too hard can be reduced in volume or cut entirely if it occurs between sentences. These corrections distinguish recorded audio from produced audio. Listeners should notice only smooth, intentional narration, not the edits themselves.
Preview and Export the Final Video (Minute 10)
Watch the full video once to ensure the narration matches the visuals. If everything sounds right, export the final video.
What makes this workflow so efficient?
A final preview ensures pacing and timing feel natural. Within 10 minutes, the creator has a video with a clear, synchronized voiceover. This workflow transforms voiceover production from an unpredictable creative task into a systematic process with predictable outcomes. The speed comes from eliminating decision points during execution. You're not stopping to think about what to say, where audio should go, or how segments connect—those decisions happened during preparation. Recording becomes the execution of a plan, not improvisation under pressure.
Related Reading
- AI Voiceover Generation Tools
- Uberduck AI Alternative
- Play.ht Alternatives
- Murf AI Vs Elevenlabs
- Murf AI Alternatives
- Speechify Alternative
- Wellsaid Labs Alternative
- Resemble AI Alternative
- Lovo.ai Alternative Free
- Elevenlabs Alternative